 GitHub Actions 实现自动部署静态博客
# iuwenkai #link: https://github.com/kevin
# GitHub Actions 实现自动部署静态博客
# 前言
我使用vuepress搭建了一个静态博客,挂在了Github pages和Coding pages (opens new window)上面。
coding pages在国内的访问速度比github pages要快很多,而且还可以被百度收录。
一开始的部署方式是使用sh部署脚本 (opens new window)把代码提交到这两个平台的仓库分支,虽然已经很方便了,但是我还想把博客未打包的源码提交到Github主分支上。这就需要我操作两次命令,我就想能不能只需要一次操作就可以同时把源码、部署代码一次性提交到两个平台呢?
# 实现
在了解GitHub Actions最近(2019.12)刚正式发布了之后,尝试使用它发现能够满足我的需求。GitHub Actions 入门教程 (opens new window)
首先,需要获取token,后面会用到。获取方法:github获取token官方文档 (opens new window)、coding获取token官方文档 (opens new window)。
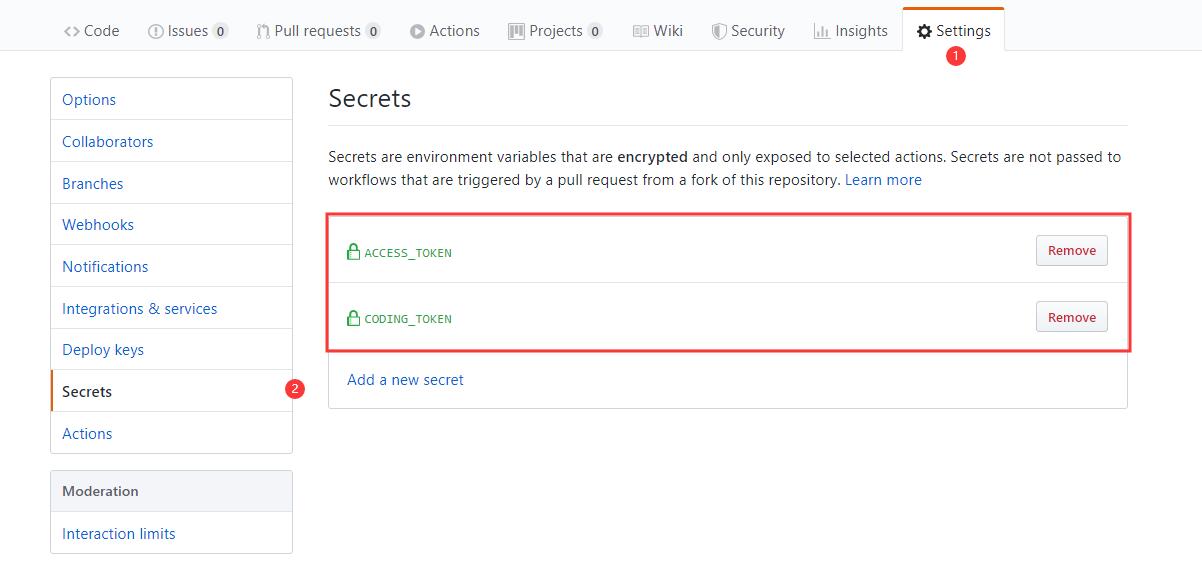
然后,将这两个token同时储存到github仓库的Settings/Secrets里面。变量名可以随便取,但是注意要和后面的ci.yml文件内的变量名一致,这里取的是ACCESS_TOKEN和CODING_TOKEN。

GitHub Actions 的配置文件叫做 workflow 文件,存放在代码仓库的.github/workflows目录。
workflow 文件采用 YAML 格式 (opens new window),文件名可以任意取,但是后缀名统一为.yml,比如ci.yml。一个库可以有多个 workflow 文件。GitHub 只要发现.github/workflows目录里面有.yml文件,就会自动运行该文件。
我的ci.yml文件:
name: CI

# 在master分支发生push事件时触发。
on:
  push:
    branches:
      - master
jobs: # 工作流
  build:
    runs-on: ubuntu-latest #运行在虚拟机环境ubuntu-latest

    strategy:
      matrix:
        node-version: [10.x]

    steps:
      - name: Checkout # 步骤1
        uses: actions/checkout@v1 # 使用的动作。格式:userName/repoName。作用:检出仓库,获取源码。 官方actions库:https://github.com/actions
      - name: Use Node.js ${{ matrix.node-version }} # 步骤2
        uses: actions/setup-node@v1 # 作用:安装nodejs
        with:
          node-version: ${{ matrix.node-version }} # 版本
      - name: run deploy.sh # 步骤3 (同时部署到github和coding)
        env: # 设置环境变量
          GITHUB_TOKEN: ${{ secrets.ACCESS_TOKEN }} # toKen私密变量
          CODING_TOKEN: ${{ secrets.CODING_TOKEN }} # 腾讯云开发者平台(coding)私密token
        run: npm install && npm run deploy # 执行的命令
        # package.json 中添加 "deploy": "bash deploy.sh"
2
3
4
5
6
7
8
9
10
11
12
13
14
15
16
17
18
19
20
21
22
23
24
25
26
27
28
这个配置文件会在我push提交代码到主分支时触发工作,运行环境是ubuntu-latest,工作步骤:
一,获取仓库源码
二,安装nodejs,打包项目有用到nodejs
三,把token设置到环境变量,安装项目依赖,并运行
deploy.sh文件,
ACCESS_TOKE 和 CODING_TOKEN 都是保存在github仓库的
Settings/Secrets位置的私密变量,仓库代码中可以通过<secrets.变量名>来获取,保证了token的私密性。
再来看看将要被运行的deploy.sh部署代码:
#!/usr/bin/env sh
# 确保脚本抛出遇到的错误
set -e
npm run build # 生成静态文件
cd docs/.vuepress/dist # 进入生成的文件夹

# deploy to github
echo 'blog.liuwenkai.com' > CNAME
if [ -z "$GITHUB_TOKEN" ]; then
  msg='deploy'
  githubUrl=git@github.com:liuwenkai/blog.git
else
  msg='来自github action的自动部署'
  githubUrl=https://liuwenkai:${GITHUB_TOKEN}@github.com/liuwenkai/blog.git
  git config --global user.name "liuwenkai"
  git config --global user.email "610725422@qq.com"
fi
git init
git add -A
git commit -m "${msg}"
git push -f $githubUrl master:gh-pages # 推送到github

# deploy to coding
echo 'www.liuwenkai.com\nliuwenkai.com' > CNAME  # 自定义域名
if [ -z "$CODING_TOKEN" ]; then  # -z 字符串 长度为0则为true;$CODING_TOKEN来自于github仓库`Settings/Secrets`设置的私密环境变量
  codingUrl=git@git.dev.tencent.com:liuwenkai/liuwenkai.git
else
  codingUrl=https://liuwenkai:${CODING_TOKEN}@git.dev.tencent.com/liuwenkai/liuwenkai.git
fi
git add -A
git commit -m "${msg}"
git push -f $codingUrl master # 推送到coding

cd -
rm -rf docs/.vuepress/dist
2
3
4
5
6
7
8
9
10
11
12
13
14
15
16
17
18
19
20
21
22
23
24
25
26
27
28
29
30
31
32
33
34
35
这个文件使用Shell命令 (opens new window)写的,它会先运行打包命令,进入打包好的文件,创建一个自定义域名的CNAME文件(如果你没有自定义域名可去掉这个命令),判断是否有token环境变量,如果没有说明是在本地自己的电脑上运行的部署,使用ssh代码仓库地址,如果有token环境变量,说明是GitHub Actions自动触发的部署,此时使用的是可以通过toKen来获取代码提交权限的提交地址。最后通过git命令提交到各自的仓库,完成部署。
提示:
Shell 可以获取到环境变量。
我想给两个平台上部署的博客不一样的自定义域名,因此做了分开创建CNAME文件,分开提交。
至此,我前面提到的需求就实现啦,只需要把源码push到github仓库这一个步骤,后面的博客打包、部署到github和coding等工作都由GitHub Actions来自动完成。
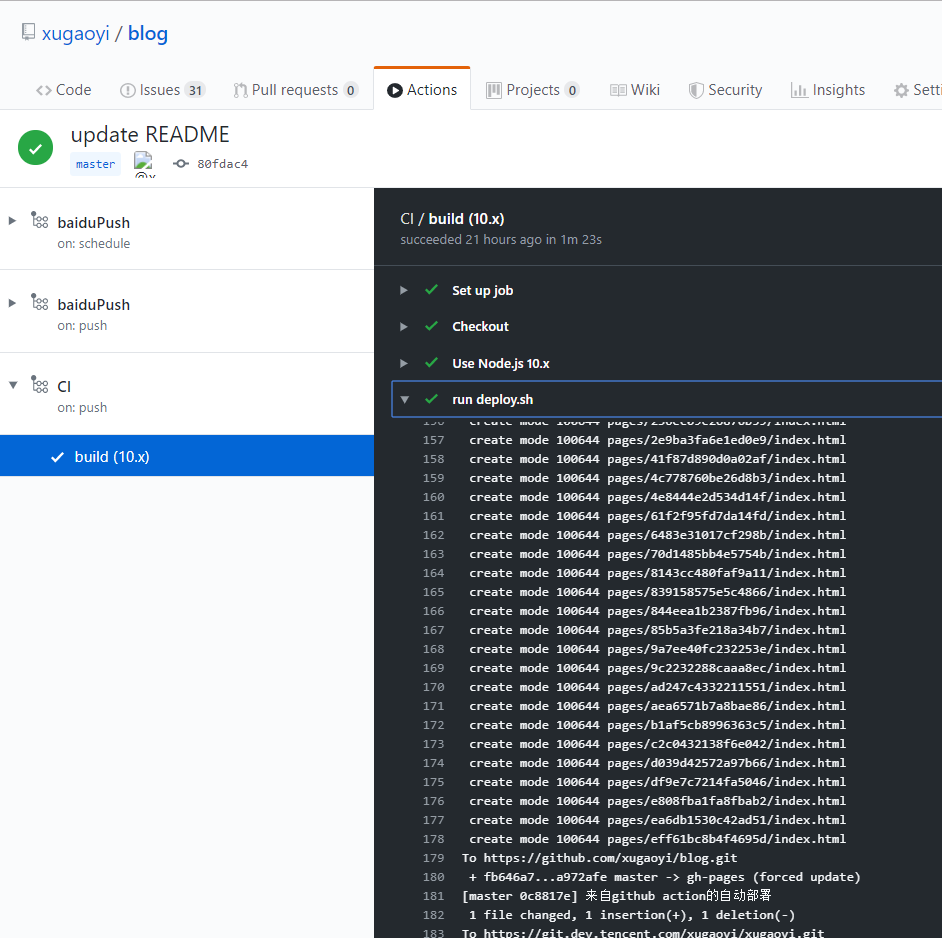
如下你想查看部署日志,你可以到github仓库的Actions这一项查看。

# github action自动推送部署腾讯服务器CI.yml
name: CI

#on: [push]

# 在master分支发生push事件时触发。
on:
  push:
    branches:
      - master

env: # 设置环境变量
  TZ: Asia/Shanghai # 时区(设置时区可使页面中的`最近更新时间`使用时区时间)

jobs:
  build: # 自定义名称
    runs-on: ubuntu-latest # 运行在虚拟机环境ubuntu-latest

    strategy:
      matrix:
        node-version: [12.x]

    steps:
      # 1.检出仓库
      - name: Checkout
        uses: actions/checkout@master # 使用的动作。格式:userName/repoName。 官方actions库:https://github.com/actions
        with:
          persist-credentials: false

      # 2.安装nodejs
      - name: Use Node.js ${{ matrix.node-version }}
        uses: actions/setup-node@v1
        with:
          node-version: ${{ matrix.node-version }}

      # 3.生成静态文件
      - name: Build
        run: npm install && npm run build

#      # 4.部署到 GitHub Pages
#      - name: Deploy
#        uses: JamesIves/github-pages-deploy-action@releases/v3
#        with:
#          ACCESS_TOKEN: ${{ secrets.ACCESS_TOKEN }}
#          REPOSITORY_NAME: 954118124/blog
#          BRANCH: gh-pages
#          FOLDER: docs/.vuepress/dist #注意这里是 npm run build 生成静态资源的路径:docs/.vuepress/dist

      # 4. 部署到腾讯云服务器
      - name: Deploy to Server
        uses: easingthemes/ssh-deploy@v2.0.7
        env:
          SSH_PRIVATE_KEY: ${{ secrets.LOUIS_ACCESS }} # 私钥
          # 复制操作的参数。"-avzr --delete"意味部署时清空服务器目标目录下的文件
          ARGS: "-avzr --delete"
          # 源目录,相对于$GITHUB_WORKSPACE根目录的路径
          SOURCE: "docs/.vuepress/dist/"
          # 服务器域名
          REMOTE_HOST: "43.138.216.21" # 公网ip
          # 腾讯云默认用户名为root
          REMOTE_USER: "root"
          # 目标目录
          TARGET: "/louis/blog"
2
3
4
5
6
7
8
9
10
11
12
13
14
15
16
17
18
19
20
21
22
23
24
25
26
27
28
29
30
31
32
33
34
35
36
37
38
39
40
41
42
43
44
45
46
47
48
49
50
51
52
53
54
55
56
57
58
59
60
61
62
